Marbled Pink Valentine Cookies

Introduction
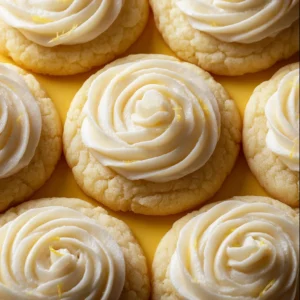
Picture this – a batch of freshly baked Marbled Pink Valentine Cookies straight out of the oven, filling your kitchen with a sweet aroma that promises delightful indulgence. These cookies are not just a treat for the taste buds but a visual delight, perfect for celebrating love and sweetness on Valentine’s Day or any special occasion.
What makes these Marbled Pink Valentine Cookies truly special is their unique appearance and irresistible taste. The marbling effect created by swirling pink and white dough together gives each cookie a one-of-a-kind look, making them a standout addition to any dessert table.
With a hint of vanilla and a touch of sweetness, these cookies are a joy to bake and share. Whether you’re a baking enthusiast looking for a creative project or someone searching for the perfect homemade gift, these Marbled Pink Valentine Cookies are sure to impress.
So, roll up your sleeves, preheat your oven, and let’s dive into the delightful world of baking these eye-catching and delicious cookies.
Why You’ll Love This Recipe
These Marbled Pink Valentine Cookies are not only visually stunning but also incredibly easy to make. With just a few simple ingredients and a bit of creativity, you can achieve professional-looking results that will wow your friends and family.
One of the best features of this recipe is its versatility. You can customize the colors and patterns to suit any occasion, making it a go-to recipe for birthdays, holidays, or simply when you’re in the mood for a sweet treat.
Additionally, these cookies are a great way to involve kids in the kitchen. The swirling technique is fun and engaging for children of all ages, making it a perfect family baking project that everyone can enjoy together.
And let’s not forget the taste! These Marbled Pink Valentine Cookies are soft, buttery, and perfectly sweet, making them a delightful snack or dessert option for any time of day.
Ingredients
For this recipe, you will need the following ingredients:
– All-purpose flour
– Baking powder
– Salt
– Unsalted butter, softened
– Granulated sugar
– Egg
– Vanilla extract
– Pink food coloring
– Optional: Sprinkles for decoration
Step-by-Step Instructions
1. In a bowl, whisk together the all-purpose flour, baking powder, and salt. Set aside.
2. In a separate bowl, cream together the softened butter and granulated sugar until light and fluffy.
3. Add the egg and vanilla extract to the butter mixture and beat until well combined.
4. Gradually add the dry ingredients to the wet ingredients, mixing until a dough forms.
5. Divide the dough in half. Color one half with pink food coloring, leaving the other half plain.
6. Take a small piece of each colored dough and gently swirl them together to create a marbled effect.
7. Roll the marbled dough into balls and place them on a baking sheet lined with parchment paper.
8. Flatten each ball slightly and decorate with sprinkles, if desired.
9. Bake the cookies in a preheated oven until the edges are lightly golden.
10. Allow the cookies to cool before serving and enjoying the delightful flavors and textures.
Expert Tips for Success
To achieve the perfect marbled effect, avoid overmixing the dough once the colors are swirled together. A few gentle folds are all you need to create a beautiful pattern.
For a more vibrant pink color, use gel food coloring instead of liquid food coloring. Gel colors are concentrated and provide a richer hue without altering the consistency of the dough.
If the dough becomes too soft to work with, place it in the refrigerator for 15-20 minutes to firm up before continuing with the shaping and baking process.
For a variation in flavor, you can add a hint of almond extract to the dough along with the vanilla extract. This subtle twist complements the sweetness of the cookies beautifully.
Variations and Substitutions
Feel free to experiment with different food coloring combinations to create unique patterns and designs. You can also use natural food coloring options for a more wholesome twist.
If you prefer a chewier texture, reduce the baking time slightly to keep the cookies soft and tender. Conversely, for a crispier cookie, extend the baking time by a few minutes until the edges are golden brown.
For a dairy-free version of these cookies, you can substitute the butter with a plant-based margarine or coconut oil. Just ensure that the butter alternative is solid at room temperature for the best results.
Serving Suggestions
These Marbled Pink Valentine Cookies are perfect for gifting to loved ones or serving at themed parties and celebrations. Pair them with a cup of hot cocoa or a glass of cold milk for a delightful treat that appeals to all ages.
For a more indulgent experience, sandwich a scoop of your favorite ice cream between two cookies to create a delicious ice cream sandwich. The contrasting textures and flavors create a memorable dessert that will leave everyone wanting more.
Alternatively, crumble the cookies over a bowl of creamy yogurt or pudding for a fun and flavorful topping that adds a touch of sweetness to your everyday snacks.
FAQs
Q: Can I freeze the cookie dough for later use?
A: Yes, you can freeze the cookie dough either in individual portions or as a whole. Simply wrap it tightly in plastic wrap and store it in an airtight container in the freezer for up to three months. Thaw the dough in the refrigerator before baking.
Q: Can I use natural food coloring for these cookies?
A: Absolutely! Natural food coloring options derived from ingredients like beetroot powder, turmeric, or spirulina can be used to achieve vibrant hues without artificial additives.
Q: How long do these cookies stay fresh?
A: When stored in an airtight container at room temperature, these cookies will stay fresh for up to a week. For longer shelf life, you can store them in the refrigerator for up to two weeks.
Final Thoughts
As you embark on the journey of baking these Marbled Pink Valentine Cookies, remember that the process is as rewarding as the end result. From mixing the dough to creating intricate patterns, each step is an opportunity to infuse love and creativity into your baking.
So gather your ingredients, unleash your imagination, and let the magic of baking unfold in your kitchen. Whether you’re baking these cookies for a special someone or simply indulging in some self-care, the joy of sharing homemade treats knows no bounds.
May these Marbled Pink Valentine Cookies bring sweetness, warmth, and a touch of whimsy to your day, reminding you that every moment is a chance to create something beautiful and delicious.

Marbled Pink Valentine Cookies
These Marbled Pink Valentine Cookies are visually stunning and incredibly easy to make. With a soft, buttery texture and a touch of sweetness, they are perfect for celebrating love and sweetness on Valentine’s Day or any special occasion.
Ingredients
- 2 cups all-purpose flour
- 1 tsp baking powder
- 1/4 tsp salt
- 1 cup unsalted butter, softened
- 3/4 cup granulated sugar
- 1 egg
- 1 tsp vanilla extract
- Pink food coloring
- Sprinkles for decoration
Directions
- In a bowl, whisk together the all-purpose flour, baking powder, and salt. Set aside.
- In a separate bowl, cream together the softened butter and granulated sugar until light and fluffy.
- Add the egg and vanilla extract to the butter mixture and beat until well combined.
- Gradually add the dry ingredients to the wet ingredients, mixing until a dough forms.
- Divide the dough in half. Color one half with pink food coloring, leaving the other half plain.
- Take a small piece of each colored dough and gently swirl them together to create a marbled effect.
- Roll the marbled dough into balls and place them on a baking sheet lined with parchment paper.
- Flatten each ball slightly and decorate with sprinkles, if desired.
- Bake the cookies in a preheated oven until the edges are lightly golden.
- Allow the cookies to cool before serving and enjoying the delightful flavors and textures.