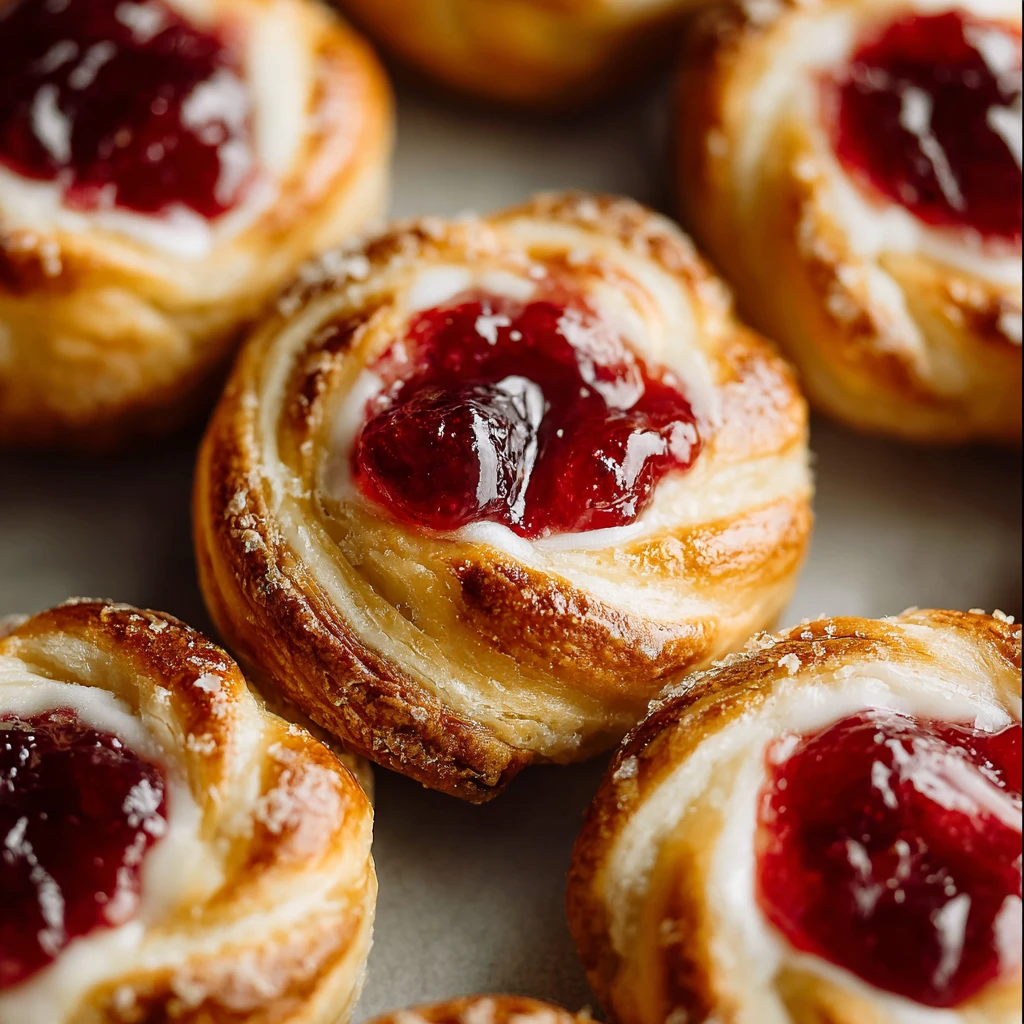
Cherry Cheesecake Danish

Introduction
Imagine a flaky, buttery pastry filled with a creamy, rich cheesecake layer and topped with sweet and tangy cherry compote. That’s the magic of a Cherry Cheesecake Danish. This delightful treat combines the best of both worlds – the indulgent goodness of cheesecake and the convenience of a Danish pastry. Whether you’re looking for a decadent breakfast pastry or a delicious dessert, this recipe has you covered.
What makes this Cherry Cheesecake Danish special is its perfect balance of flavors and textures. The crispiness of the pastry complements the smoothness of the cheesecake filling, while the burst of cherry flavor adds a refreshing twist. This recipe is not only a feast for the taste buds but also a visual delight, making it an ideal choice for special occasions or lazy weekend mornings.
With its origins rooted in the traditional Danish pastry-making techniques, the Cherry Cheesecake Danish brings a touch of European charm to your table. The combination of sweet cherries and creamy cheese is a classic pairing that has stood the test of time, making this recipe a timeless favorite for many.
Get ready to embark on a culinary journey filled with sweetness, creaminess, and a touch of tartness. Let’s dive into the delightful world of Cherry Cheesecake Danish and uncover the secrets to creating this delectable treat in your own kitchen.
Why You’ll Love This Recipe
One of the standout features of this Cherry Cheesecake Danish recipe is its versatility. Whether you’re a novice baker or a seasoned pro, this recipe is easy to follow and guarantees impressive results. The combination of flavors and textures in this pastry will leave you craving for more with every bite.
Moreover, this recipe offers a homemade alternative to store-bought pastries, allowing you to customize the ingredients and adjust the sweetness according to your preference. By making this Cherry Cheesecake Danish at home, you can enjoy a fresher, more flavorful pastry that is sure to impress your family and friends.
From a dietary standpoint, this recipe can be adapted to suit various preferences. Whether you’re looking to reduce sugar content, incorporate gluten-free alternatives, or experiment with different fruit toppings, the Cherry Cheesecake Danish recipe provides ample room for creativity and personalization.
Indulge in the joy of baking as you whip up this delightful pastry in your own kitchen. The process is not only rewarding but also therapeutic, allowing you to experience the satisfaction of creating a mouthwatering dessert from scratch.
Ingredients
Before you embark on your Cherry Cheesecake Danish baking adventure, make sure you have the following ingredients on hand:
– Puff pastry sheets
– Cream cheese
– Granulated sugar
– Vanilla extract
– Egg
– Cherry pie filling
– Lemon zest
For those looking to add a personal touch to their pastries, feel free to explore ingredient substitutions such as using almond extract instead of vanilla or opting for a homemade cherry compote in place of the pie filling. These variations can elevate the flavors of your Cherry Cheesecake Danish and make it truly unique.
Now that you have gathered your ingredients, let’s dive into the step-by-step instructions for creating this delectable Cherry Cheesecake Danish.
Step-by-Step Instructions
1. Begin by preheating your oven to 400°F (200°C) and lining a baking sheet with parchment paper.
2. Roll out the puff pastry sheets on a lightly floured surface and cut them into equal-sized rectangles.
3. In a mixing bowl, combine the cream cheese, sugar, vanilla extract, and egg until smooth and creamy.
4. Spread the cream cheese mixture evenly onto each puff pastry rectangle, leaving a border around the edges.
5. Top the cream cheese layer with a generous spoonful of cherry pie filling and a sprinkle of lemon zest.
6. Fold the edges of the pastry over the filling to create a border, then brush the pastry with an egg wash for a golden finish.
7. Bake the pastries in the preheated oven for 15-20 minutes or until the pastry is puffed and golden brown.
8. Once baked, allow the Cherry Cheesecake Danish to cool slightly before serving. Enjoy the pastries warm or at room temperature for the best flavor experience.
Expert Tips for Success
For a professional touch, chill the assembled pastries in the refrigerator for 15-20 minutes before baking. This helps the pastry maintain its shape and prevents excessive spreading during baking.
Feel free to experiment with different fruit fillings such as blueberry, raspberry, or peach to create your own variations of the Cherry Cheesecake Danish.
To add a crunchy texture, sprinkle some sliced almonds or crushed pistachios on top of the pastries before baking.
Ensure that your cream cheese is at room temperature before mixing it with the other ingredients. This helps achieve a smooth and lump-free cheesecake filling.
Variations and Substitutions
If you prefer a lighter version of the Cherry Cheesecake Danish, you can opt for reduced-fat cream cheese or Greek yogurt as a substitute. This variation offers a tangier flavor profile while reducing the overall calorie content of the pastry.
For a gluten-free alternative, use gluten-free puff pastry sheets or make your own gluten-free pastry dough using a blend of alternative flours such as almond flour or coconut flour. This adaptation allows individuals with gluten sensitivities to enjoy the deliciousness of Cherry Cheesecake Danish without compromising on taste.
For a vegan twist on this recipe, replace the cream cheese and egg with dairy-free alternatives such as vegan cream cheese and a flaxseed egg. Pair these substitutions with a plant-based cherry filling for a completely vegan-friendly version of the pastry.
Don’t hesitate to get creative with your ingredient choices and explore different flavor combinations to tailor the Cherry Cheesecake Danish to your liking.
Serving Suggestions
To elevate the presentation of your Cherry Cheesecake Danish, dust the pastries with powdered sugar before serving. This adds a touch of elegance and enhances the visual appeal of the dish.
Pair your pastries with a dollop of whipped cream or a scoop of vanilla ice cream for a delightful contrast of temperatures and textures. The creamy cheesecake filling complements the lightness of the whipped cream or the richness of the ice cream, creating a harmonious dessert experience.
For a complete brunch spread, serve the Cherry Cheesecake Danish alongside a fresh fruit salad, a selection of cheeses, and a pot of freshly brewed coffee or tea. This combination offers a balance of flavors and textures that will satisfy even the most discerning palates.
Whether enjoyed as a standalone treat or as part of a larger meal, the Cherry Cheesecake Danish is sure to impress your guests and leave them craving for more.
FAQs
Q: Can I make the Cherry Cheesecake Danish ahead of time?
A: Yes, you can assemble the pastries ahead of time and refrigerate them overnight. Bake them just before serving for a fresh and warm pastry experience.
Q: Can I freeze the Cherry Cheesecake Danish?
A: While it’s best to enjoy the pastries fresh, you can freeze any leftovers in an airtight container. Reheat them in the oven at a low temperature to maintain their texture and flavor.
Q: How long will the Cherry Cheesecake Danish stay fresh?
A: The pastries are best consumed within 2-3 days of baking. Store them in the refrigerator to maintain their freshness and quality.
Final Thoughts
As you embark on your culinary journey with the Cherry Cheesecake Danish recipe, remember to have fun, experiment with different flavors, and savor the process of creating a delicious and visually stunning pastry. Whether you’re baking for yourself or sharing with loved ones, this recipe is sure to bring joy and satisfaction to all who indulge in its sweet and creamy delights.
So preheat your oven, gather your ingredients, and let the aroma of freshly baked pastries fill your kitchen as you create a masterpiece that combines the best of cheesecake and Danish pastry in every bite. Enjoy the experience, and relish every moment of indulgence with this delectable Cherry Cheesecake Danish recipe.
Cherry Cheesecake Danish
A flaky, buttery pastry filled with a creamy cheesecake layer and topped with sweet cherry compote, creating a delightful treat that balances flavors and textures perfectly.
Ingredients
- 2 sheets puff pastry
- 8 oz cream cheese
- 1/2 cup granulated sugar
- 1 tsp vanilla extract
- 1 egg
- 1 cup cherry pie filling
- 1 tsp lemon zest
Directions
- Preheat the oven to 400°F (200°C) and line a baking sheet with parchment paper.
- Roll out the puff pastry sheets on a lightly floured surface and cut them into equal-sized rectangles.
- In a mixing bowl, combine cream cheese, sugar, vanilla extract, and egg until smooth and creamy.
- Spread the cream cheese mixture evenly onto each puff pastry rectangle, leaving a border around the edges.
- Top the cream cheese layer with cherry pie filling and lemon zest.
- Fold the edges of the pastry over the filling to create a border, then brush the pastry with an egg wash.
- Bake the pastries in the preheated oven for 15-20 minutes until puffed and golden brown.
- Allow the Cherry Cheesecake Danish to cool slightly before serving. Enjoy warm or at room temperature.